[Eclipse] 이클립스 웹 프로젝트 레진(resin) 설정 방법
이클립트 웹 프로젝트를 톰캣(tomcat)이 아닌 레진(resin)으로 기동하는 방법이다.
참고로 이클립스 2020-12 버전, JDK 1.6 버전, resin 3.0.23 버전을 사용했다.
이클립스 버전과 JDK 버전은 크게 상관이 없을 것 같고, resin은 가급적 같은 버전을 사용하는 것을 권장한다.
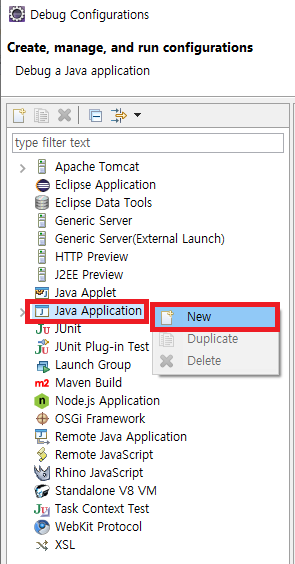
1. 이클립스 상단 메뉴의 [Run] – [Run Configurations…] 메뉴를 클릭한다.
2. Run Configurations 윈도우가 뜨면 좌측의 Java Application 항목을 마우스 우클릭, [New] 버튼을 클릭해서 새로운 설정을 생성한다.
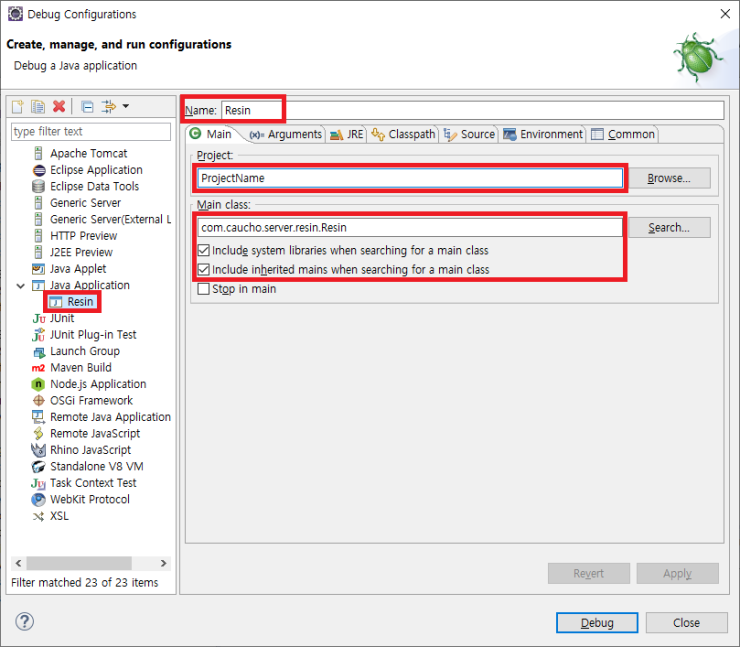
3. Main 탭 설정
Name 항목 : Resin 입력한다.
Project 항목 : [Browse] 버튼을 이용해서 프로젝트를 선택한다.
Main Class 항목 : com.caucho.server.resin.Resin 이라고 입력한다.
Include system libraries when searching for a main class 체크박스 : 체크 처리한다.
Include inherited mains when searching for a main class 체크박스 : 체크 처리한다.
4. Arguments 탭 설정
Program arguments 항목 : -conf “C:\프로젝트경로\폴더명\resin.conf” 를 입력한다.
ex) -conf “C:\test\workspaces\ProjectName\FolderName\resin.conf”
VM arguments 항목
-Djava.util.logging.manager=com.caucho.log.LogManagerImpl
-Djavax.management.builder.initial=com.caucho.jmx.MBeanServerBuilderImpl
-Dresin.home=”C:\resin-3.0.23″

갖고 있는 resin.conf 파일이 없다면 다음과 같이 생성한다.
javac compiler 부분과 document-directory 부분을 알맞게 고치면 된다.
|
<!– – Resin 3.0 configuration file. –> <resin xmlns=“http://caucho.com/ns/resin“ xmlns:resin=“http://caucho.com/ns/resin/core“> <!– – Logging configuration for the JDK logging API. –> <log name=” level=‘info’ path=‘stdout:’ timestamp=‘[%H:%M:%S.%s] ‘/> <log name=‘com.caucho.java’ level=‘config’ path=‘stdout:’ timestamp=‘[%H:%M:%S.%s] ‘/> <log name=‘com.caucho.loader’ level=‘config’ path=‘stdout:’ timestamp=‘[%H:%M:%S.%s] ‘/>
<!– – For production sites, change dependency-check-interval to something – like 600s, so it only checks for updates every 10 minutes. –> <dependency-check-interval>2s</dependency-check-interval>
<!– – You can change the compiler to “javac” or jikes. – The default is “internal” only because it’s the most – likely to be available. –> <javac compiler=“C:\java\jdk1.6.0_45\bin\javac.exe“ args=“”/>
<!– Security providers. – <security-provider> – com.sun.net.ssl.internal.ssl.Provider – </security-provider> –>
<!– – If starting bin/resin as root on Unix, specify the user name – and group name for the web server user. – – <user-name>resin</user-name> – <group-name>resin</group-name> –>
<!– – Configures threads shared among all HTTP and SRUN ports. –> <thread-pool> <!– Maximum number of threads. –> <thread-max>128</thread-max>
<!– Minimum number of spare connection threads. –> <spare-thread-min>25</spare-thread-min> </thread-pool>
<!– – Configures the minimum free memory allowed before Resin – will force a restart. –> <min-free-memory>1M</min-free-memory>
<server> <!– adds all .jar files under the resin/lib directory –> <class-loader> <tree-loader path=“$resin-home/lib”/> </class-loader>
<!– Configures the keepalive –> <keepalive-max>500</keepalive-max> <keepalive-timeout>120s</keepalive-timeout>
<!– The http port –> <http server-id=“” host=“*” port=“80”/>
<!– – SSL port configuration: – – <http port=”8443″> – <openssl> – <certificate-file>keys/gryffindor.crt</certificate-file> – <certificate-key-file>keys/gryffindor.key</certificate-key-file> – <password>test123</password> – </openssl> – </http> –>
<!– – The local cluster, used for load balancing and distributed – backup. –> <cluster> <srun server-id=“” host=“127.0.0.1” port=“6803” index=“1”/> </cluster>
<!– – Enables/disables exceptions when the browser closes a connection. –> <ignore-client-disconnect>true</ignore-client-disconnect>
<!– – Enables the cache –> <!– <cache path=”cache” memory-size=”10M”/> –>
<!– – Enables periodic checking of the server status. – – With JDK 1.5, this will ask the JDK to check for deadlocks. – All servers can add <url>s to be checked. –> <!– <ping> <url></url>”>http://localhost:8080/test-ping.jsp</url> </ping> –>
<!– – Defaults applied to each web-app. –> <web-app-default> <!– – Sets timeout values for cacheable pages, e.g. static pages. –> <cache-mapping url-pattern=“/” expires=“5s”/> <cache-mapping url-pattern=“*.gif” expires=“60s”/> <cache-mapping url-pattern=“*.jpg” expires=“60s”/>
<!– – Servlet to use for directory display. –> <servlet servlet-name=“directory” servlet-class=“com.caucho.servlets.DirectoryServlet”/> </web-app-default>
<!– – Sample database pool configuration – – The JDBC name is java:comp/env/jdbc/test – <database> <jndi-name>jdbc/mysql</jndi-name> <driver type=”org.gjt.mm.mysql.Driver”> <url>jdbc:mysql://localhost:3306/test</url> <user></user> <password></password> </driver> <prepared-statement-cache-size>8</prepared-statement-cache-size> <max-connections>20</max-connections> <max-idle-time>30s</max-idle-time> </database> –>
<!– – Default host configuration applied to all virtual hosts. –> <host-default> <class-loader> <compiling-loader path=‘webapps/WEB-INF/classes’/> <library-loader path=‘webapps/WEB-INF/lib’/> </class-loader>
<!– – With another web server, like Apache, this can be commented out – because the web server will log this information. –> <access-log path=‘logs/access.log’ format=‘%h %l %u %t “%r” %s %b “%{Referer}i” “%{User-Agent}i”‘ rollover-period=‘1W’/>
<!– creates the webapps directory for .war expansion –> <web-app-deploy path=‘webapps’/>
<!– creates the deploy directory for .ear expansion –> <ear-deploy path=‘deploy’> <ear-default> <!– Configure this for the ejb server – – <ejb-server> – <config-directory>WEB-INF</config-directory> – <data-source>jdbc/test</data-source> – </ejb-server> –> </ear-default> </ear-deploy>
<!– creates the deploy directory for .rar expansion –> <resource-deploy path=‘deploy’/>
<!– creates a second deploy directory for .war expansion –> <web-app-deploy path=‘deploy’/> </host-default>
<!– includes the web-app-default for default web-app behavior –> <resin:import path=“${resinHome}/conf/app-default.xml”/>
<!– configures the default host, matching any host name –> <host id=”> <document-directory>C:\test\workspaces\ProjectName\FolderName\webapp</document-directory>
<!– configures the root web-app –> <web-app id=”> <document-directory>C:\test\workspaces\ProjectName\FolderName\webapp</document-directory> <class-loader/> <servlet-mapping url-pattern=“/servlet/*” servlet-name=“invoker”/>
<!– 최초 기동시 실행할 서블릿 –> <!-– <servlet servlet-name=“starton” servlet-class=“com.test.servlet.HomeServlet”> <load-on-startup /> </servlet> –> </web-app> </host> </server> </resin> |
5. JRE 탭 설정
특별한 설정은 없다. 여기서는 JDK 1.6을 사용했지만 다른 버전이어도 상관없다.

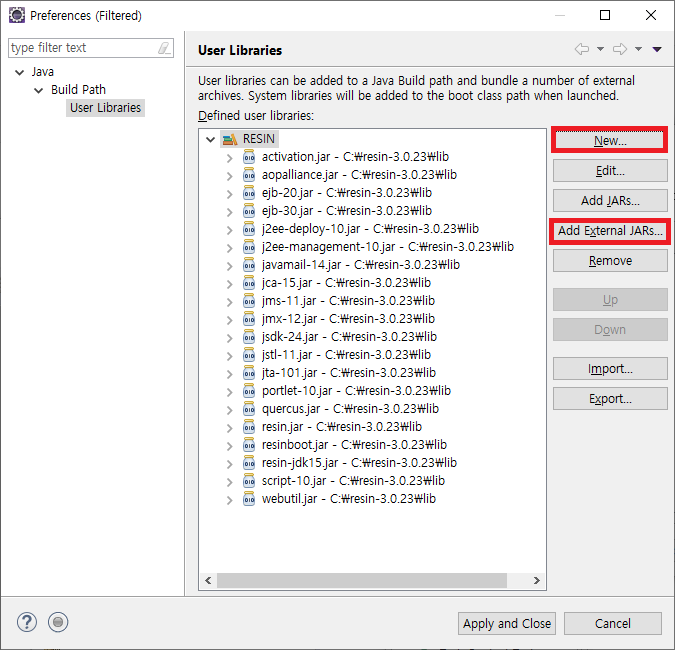
6. Classpath 탭 설정
우측의 [Advanced] 버튼을 클릭해서 RESIN 이라는 이름의 User Library 를 추가해주자.
레진 관련 라이브러리를 한꺼번에 담기 위한 방법이다.

우측의 [Advanced] 버튼을 클릭 – [Add Library] 라디오 버튼 선택하고 [OK] 버튼 클릭 – [User Library] 항목 선택 – [User Libraries…] 버튼 클릭

우측의 [New…] 버튼을 이용해서 RESIN 라이브러리를 생성하고, [Add External JARs…] 버튼을 통해 프로젝트 외부에 있는 레진 관련 라이브러리들을 모두 추가하자. 예를 들면 C:\resin-3.0.23\lib 폴더 내의 모든 jar 파일을 추가하면 된다.
7. Source 탭 설정
특별한 설정이 없다.

8. Environment 탭 설정
특별한 설정이 없다.

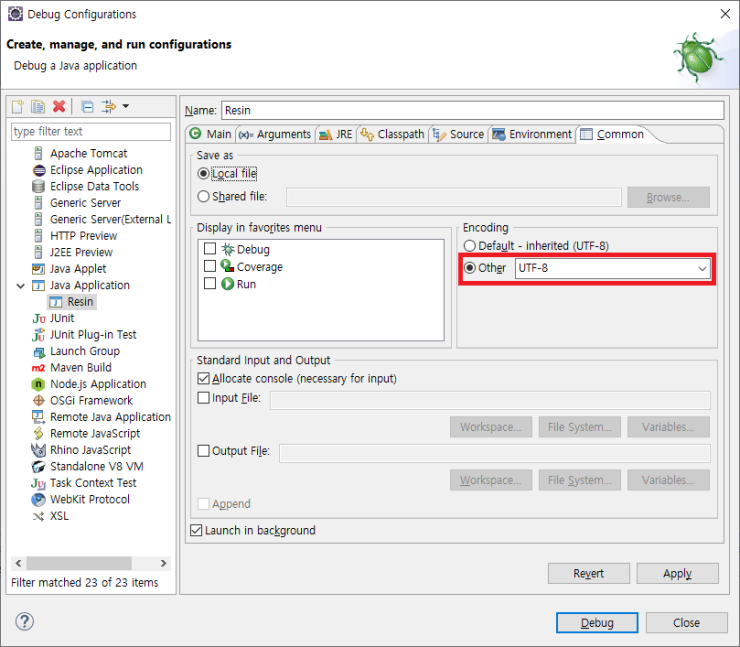
9. Common 탭 설정
특별한 설정은 없고 필요하다면 Encoding 값을 UTF-8로 지정해주자.
여기까지가 이클립스에서 웹 프로젝트를 레진(resin)으로 기동하기 위한 설정 방법이다.